
BLOG POST: HOW TO STAIN YOUR DECK
Deck Staining
Guide 101
Professional deck staining helps restore the natural beauty of exterior wood while protecting it from moisture, UV exposure, and everyday weathering. Proper preparation and a quality penetrating stain or oil can enhance the wood grain, improve colour, and help prevent premature drying, cracking, and deterioration. Regular deck staining is an important part of maintaining cedar and pressure-treated wood while keeping your outdoor space looking clean, rich, and well cared for.

Deck Staining Steps
Supplies Needed
Before beginning your deck restoration project, make sure you have the proper tools and materials ready. Depending on the condition of your deck, you may need:
-
A drill or hammer to secure loose screws, fasteners, or nails
-
Replacement deck boards and a saw for damaged or deteriorated lumber, if necessary
-
A pump sprayer for applying deck cleaner, stripper, and wood brightener
-
A pressure washer with an appropriate low-pressure nozzle
-
An orbital sander with approximately 80–100 grit sanding discs
-
A leaf blower, shop vacuum, or broom for removing sanding dust
-
Painter's tape and protective tarps or drop cloths
-
Paint brushes, staining pads, or other applicators recommended for your stain
-
Your chosen exterior deck stain
Step 1: Inspect and Repair the Deck
Before washing anything, carefully inspect the deck for loose fasteners, damaged boards, protruding nails, rot, or other areas that may require attention. Tighten loose screws and replace damaged or deteriorated boards where necessary. Taking care of these repairs before cleaning and staining gives you a much better surface to work with and prevents you from having to disturb freshly restored areas later.

Step 2: Wash and Prepare the Wood
Proper deck washing is one of the most important parts of the restoration process. Instead of immediately blasting the wood with a pressure washer, begin with an appropriate deck cleaner or stain stripper depending on the condition of the existing finish. Allow the cleaning product to work according to its instructions before thoroughly rinsing the deck. When pressure washing wood, more pressure does not mean better cleaning. Use the lowest effective pressure and keep the nozzle a safe distance from the surface. Excessive pressure can permanently scar the wood, raise the grain, and create visible pressure-washing lines. Work consistently with the direction of the wood grain, moving along the length of each board rather than randomly across it. After cleaning, an appropriate wood brightener can be applied. Wood brighteners are commonly used to help neutralize the wood following certain cleaning or stripping treatments, improve its appearance, and prepare it for the next stages of restoration.
Step 3: Allow the Deck to Dry
Don't rush directly from washing into sanding or staining. The wood needs sufficient time to dry.
Drying time will depend on temperature, humidity, sunlight, airflow, wood species, and how much moisture the deck absorbed during cleaning. Rather than relying entirely on a predetermined number of days, checking the wood's moisture content can help determine when it is ready for the next stage.

Step 4: Sand the Deck
Once the deck has thoroughly dried, you can begin sanding. This is often the most labour-intensive part of a complete deck restoration, but it can also make an enormous difference in the finished appearance.
Using an orbital sander, work systematically across the deck to remove loose or deteriorated coatings, splinters, raised wood fibres, rough areas, and other imperfections.
Pay particular attention to horizontal surfaces, including deck boards and stair treads, because these areas experience the greatest amount of foot traffic and weather exposure.
Vertical surfaces such as railings, posts, and privacy screens may require less aggressive sanding depending on their condition.
Be careful not to over-sand the wood or use excessively fine sandpaper. The objective is to create a clean, smooth, receptive surface—not polish the wood so finely that it interferes with the penetration of your chosen finish.

Step 5: Remove All Sanding Dust
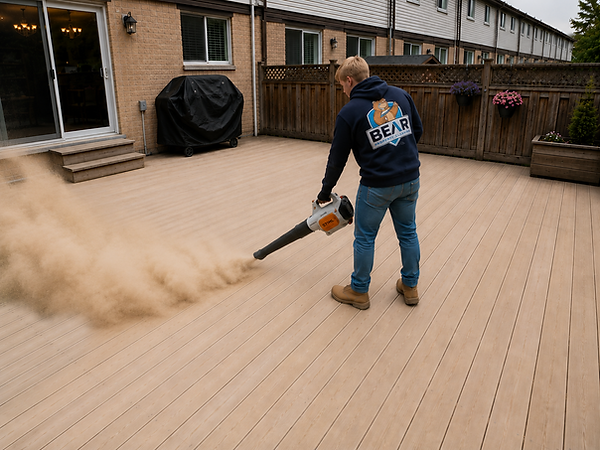
Once sanding is complete, thoroughly remove the resulting dust before staining. A leaf blower, broom, or shop vacuum can be used to clean the deck, including corners, gaps between boards, stairs, railings, and other areas where sawdust tends to accumulate. Taking a few extra minutes here can help prevent dust and debris from becoming trapped in the new finish.
Step 6: Protect the Surrounding Areas
Before opening your stain, protect everything around the deck that you don't want accidentally coated. Apply painter's tape around adjacent siding, trim, doors, and other sensitive areas as necessary. Use tarps or drop cloths to protect concrete, interlock, patios, landscaping, and other surfaces below or beside the deck. Deck stain can be extremely difficult to remove from porous surfaces once it has dried, so careful preparation can save a considerable amount of trouble later.
Step 7: Apply the Deck Stain or Wood Oil
Thoroughly mix your deck stain or penetrating wood oil according to the manufacturer's directions before beginning. A good approach is to complete railings, posts, stairs, and other vertical or detailed areas before moving onto the main horizontal deck boards. When staining the deck boards, work methodically and maintain a wet edge. Completing boards from end to end can help reduce lap marks and create a more consistent appearance. Use your brush or staining pad to work the product evenly into the wood. Avoid applying excessively heavy coats simply because you want additional protection. More stain isn't necessarily better. Penetrating finishes in particular should be applied according to the manufacturer's recommended coverage and application method.
Step 8: Let the Deck Dry and Cure
Once staining is complete, give the finish adequate time to dry before walking on the deck, replacing furniture, or returning it to regular use. Rather than automatically waiting exactly 48 hours, follow the drying and curing instructions provided by the stain manufacturer. Temperature, humidity, shade, ventilation, and wood moisture can all influence how quickly a freshly stained deck becomes ready for use.
Giving the finish sufficient time to cure is the final, and often overlooked, step toward achieving a professional-looking deck restoration that holds up over time.

DIY Deck Staining FAQs
As a homeowner can I stain my own deck?
Yes. Deck staining can be a DIY project if you have the proper equipment, enough time, and are willing to complete the preparation correctly. The actual application of deck stain is only one part of the process. Cleaning, brightening, drying, sanding, dust removal, and protecting surrounding surfaces can have a major impact on the finished result.
Do I need to clean my deck before staining it?
Yes. A deck should be thoroughly cleaned before staining to remove dirt, algae, mildew, weathered wood fibres, and other contaminants. Applying stain over a dirty or contaminated surface can prevent the product from penetrating or bonding properly and may lead to an uneven finish.
Should I pressure wash my deck before staining?
Pressure washing can be used to clean many wooden decks, but excessive pressure can damage the wood. Too much pressure or holding the nozzle too close can create lines, splinter boards, and expose soft wood fibres. Use the lowest effective pressure and work consistently with the direction of the boards.
Should I use a deck cleaner or stripper?
A deck cleaner is generally used to remove dirt, organic growth, and weathering. A deck stripper may be necessary when removing certain existing coatings or stains. The appropriate product depends on the condition of the deck and what was previously applied.
What does deck brightener do?
Wood brightener is commonly used after cleaning or stripping a deck. It helps neutralize the wood after certain cleaning products, restore a more natural appearance, and prepare the surface for the next stages of deck restoration.
Do I need to sand my deck before staining?
Sanding is highly recommended when the deck has old coating remaining, rough fibres, splinters, raised grain, or uneven areas. Sanding also creates a smoother and more uniform surface for stain application. Horizontal surfaces generally require the most attention because they receive the greatest exposure to sunlight, rain, snow, and foot traffic.
What grit sandpaper should I use for a deck?
The ideal grit depends on the condition of the wood and the stain manufacturer's recommendations. Medium-grit sandpaper is commonly used during deck restoration. Avoid polishing the wood excessively with very fine sandpaper, as this can reduce the ability of some penetrating stains to absorb properly.
Should I blow the deck off after sanding?
Yes. Sanding dust should be thoroughly removed before staining. A leaf blower, broom, or appropriate vacuum can be used to remove loose dust from the boards, joints, railings, stairs, and surrounding areas. The staining surface should be clean and free of loose debris.
Should I use an oil-based or water-based deck stain?
Both can work well when matched to the wood and properly applied. Penetrating oil-based stains are popular because they soak into the wood rather than creating a thick film on top. Water-based products can offer different drying, cleanup, colour, and performance characteristics. Always choose a product designed specifically for exterior decking.
Should I use transparent, semi-transparent, or solid deck stain?
Transparent and semi-transparent stains allow more of the natural wood grain to remain visible, while solid stains provide significantly more colour coverage. The best choice depends on the condition of the deck, desired appearance, previous coatings, and how much natural grain you want to see.
Can I apply deck stain with a roller?
Depending on the product, deck stain can be applied using brushes, stain pads, rollers, or sprayers. A roller can cover large areas quickly, but back-brushing may still be necessary to work the stain evenly into the wood. Always follow the application instructions for the specific stain you're using.
Should I stain one deck board at a time?
Working along the full length of individual boards or maintaining a wet edge can help reduce lap marks and uneven colouring. Avoid stopping halfway across a visible section and allowing the stain to dry before continuing.
How many coats of deck stain should I apply?
This depends entirely on the stain. Some penetrating products are specifically designed for a single coat, while others require two or more. Applying extra stain does not necessarily provide better protection and can actually create drying or appearance problems. Follow the manufacturer's coverage and application instructions.
What is the best weather for DIY deck staining?
Look for a suitable stretch of dry weather with temperatures and humidity within the stain manufacturer's recommended range. Avoid staining when rain is expected before the product has had enough time to dry or cure.
How long after staining can I walk on my deck?
Drying and curing times vary by product and weather conditions. Some stains may tolerate light foot traffic relatively quickly, while others require considerably longer. Follow the manufacturer's instructions rather than assuming every deck needs the same amount of time.
How often should a wooden deck be restained?
There isn't one schedule that applies to every deck. Sun exposure, moisture, snow, foot traffic, wood species, previous preparation, and the type of stain all affect longevity. Horizontal boards typically require maintenance sooner than protected vertical surfaces.
What are the biggest DIY deck staining mistakes?
Some of the most common problems come from inadequate cleaning, staining damp wood, failing to remove an incompatible old coating, sanding incorrectly, leaving sanding dust behind, applying too much stain, working in unsuitable weather, and not following the stain manufacturer's directions. With deck staining, proper preparation is often more important than the staining itself.


